Introduction
In today's rapidly evolving technological landscape, efficient and effective tools are critical for streamlined development processes. For developers working with Dynamics 365 Business Central, Visual Studio Code (VS Code) is a powerful editor that supports AL language development. This Dynamics 365 Business Central development post aims to provide a detailed, step-by-step guide on how to configure Visual Studio Code for Dynamics 365 Business Central AL development, ensuring you can make the most of this robust environment.
Prerequisites
Before diving into the configuration process, ensure you have the following prerequisites in place:
Visual Studio Code: Make sure you have the latest version of Visual Studio Code installed on your machine. You can download it from the official website.
AL Language Extension: This extension is essential for AL development and can be found in the Visual Studio Code marketplace.
Business Central Sandbox Environment: A sandbox environment is necessary for testing your developments.
Microsoft 365 Account: Access to a Microsoft 365 account is required to sign into Business Central and utilize its services.
Step-by-Step Configuration Guide
1. Install Visual Studio Code
Start by downloading and installing Visual Studio Code: Download Visual Studio Code - Mac, Linux, Windows. Follow the installation instructions for your operating system.
2. Install the AL Language Extension
Open Visual Studio Code and navigate to the Extensions view by clicking on the Extensions icon in the Activity Bar on the side of the window or by pressing `Ctrl+Shift+X`. Search for "AL Language" in the search bar, and then click "Install" to add the extension to your Visual Studio Code.

3. Set Up Your Business Central Sandbox Environment
Log in to your Dynamics 365 Business Central environment. If you don't have a sandbox environment, you can create one by following these steps:
Go to the Business Central admin center.
Select the "Environments" tab.
Click on "New" to create a new environment.
Choose "Sandbox" as the type of environment and follow the prompts to complete the setup.
4. Create a New AL Project
Once you have the AL Language extension installed, open the Command Palette by pressing `Ctrl+Shift+P`. Type `AL: Go!` and select it. This command will create a new AL project in the selected folder. Follow the prompts to connect to your Business Central environment and download the symbols.


5. Download Symbols
Downloading symbols is an essential step to ensure that your AL project can reference the necessary objects within Business Central. When you create a new AL project using `AL: Go!`, Visual Studio Code will prompt you to download symbols. If you need to download symbols later, you can do so by opening the Command Palette (`Ctrl+Shift+P`) and selecting `AL: Download Symbols`. This action will connect to your Business Central environment and download the required symbols.

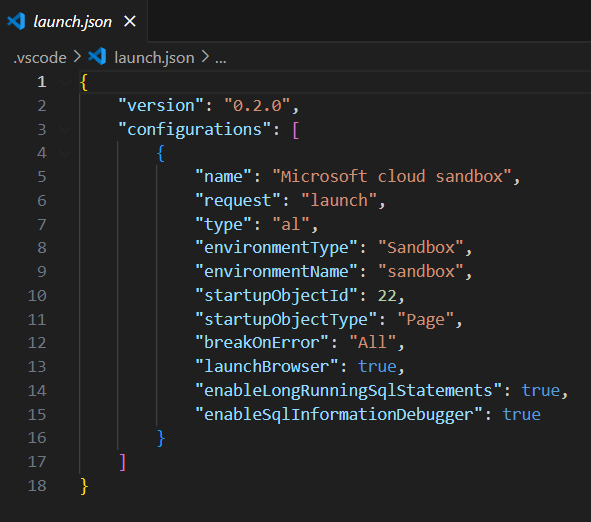
6. Configure `launch.json`
The `launch.json` file defines the connection to Business Central. You can configure this file to specify the environment, server, and authentication details. Here’s a sample configuration:

7. Configure `app.json`
The `app.json` file contains metadata about your AL project. It includes details such as the app ID, name, publisher, version, and dependencies. Here’s a basic configuration:

Development and Testing
1. Writing AL Code
With your environment set up, you can start writing AL code. Create a new folder called 'src' for the AL files of your project. Each file should define objects such as tables, pages, codeunits, and reports, which are fundamental components in Business Central.

2. Publishing and Debugging Your Code
To publish your AL code to the sandbox environment, open the Command Palette (`Ctrl+Shift+P`) and execute the `AL: Publish` command. This will compile and deploy your code to the specified Business Central instance. For debugging, set breakpoints in your AL code by clicking in the gutter next to the line numbers. Then, use the `AL: Publish` command with the debugger attached to start debugging your code.


Conclusion
Configuring Visual Studio Code for Dynamics 365 Business Central AL development is a straightforward process that, when done correctly, provides a powerful and efficient development environment. By following the steps outlined in this guide, you can ensure that your setup is optimized for writing, testing, and publishing AL code. This will enable you to leverage the full potential of Visual Studio Code and Dynamics 365 Business Central, leading to more productive and successful development projects.

Comments